

If you love cheeseburgers and quesadillas, then this recipe is going to be your new favorite! Cheeseburger quesadilla take the best of both worlds—juicy ground beef, melty cheese, and crispy tortillas—and combine them into one handheld, golden-crisp, flavor-packed meal. Perfect for weeknight dinners, game-day appetizers, or satisfying late-night cravings, these quesadillas are versatile, quick, and irresistible.

Why You Will Love This Recipe
Quick and Easy – Ready in under 30 minutes with simple pantry ingredients.
Kid-Friendly – Familiar flavors kids love, packed into a fun quesadilla shape.
Customizable – You can switch up the cheese, meat, or toppings to your liking.
Perfect for Any Occasion – Great for lunch, dinner, or a party appetizer.
Ingredients List
For the Filling:
1 lb ground beef (80/20 or lean)
1 small onion, finely chopped
1 teaspoon garlic powder
1 teaspoon onion powder
1 tablespoon ketchup
1 tablespoon yellow mustard
Salt and pepper, to taste
For Assembling:
4 large flour tortillas
2 cups shredded cheddar cheese (or a cheese blend)
1/2 cup pickles, chopped (optional but recommended)
1 tablespoon butter or oil (for frying)
Optional Toppings:
Shredded lettuce
Diced tomatoes
Extra ketchup or burger sauce for dipping
Timing & Servings
Prep Time: 10 minutes
Cook Time: 15 minutes
Total Time: 25 minutes
Servings: 4 quesadillas (each serves 1–2)
Step-by-Step Instructions for Cheeseburger Quesadilla
Step 1: Cook the Ground Beef
In a skillet over medium heat, cook the ground beef and chopped onions until the beef is browned and fully cooked. Break it up with a spatula as it cooks.
Step 2: Season the Filling
Drain excess fat, then stir in garlic powder, onion powder, ketchup, and mustard. Add salt and pepper to taste. Cook for another 1–2 minutes. Remove from heat and set aside.
Step 3: Assemble the Quesadillas
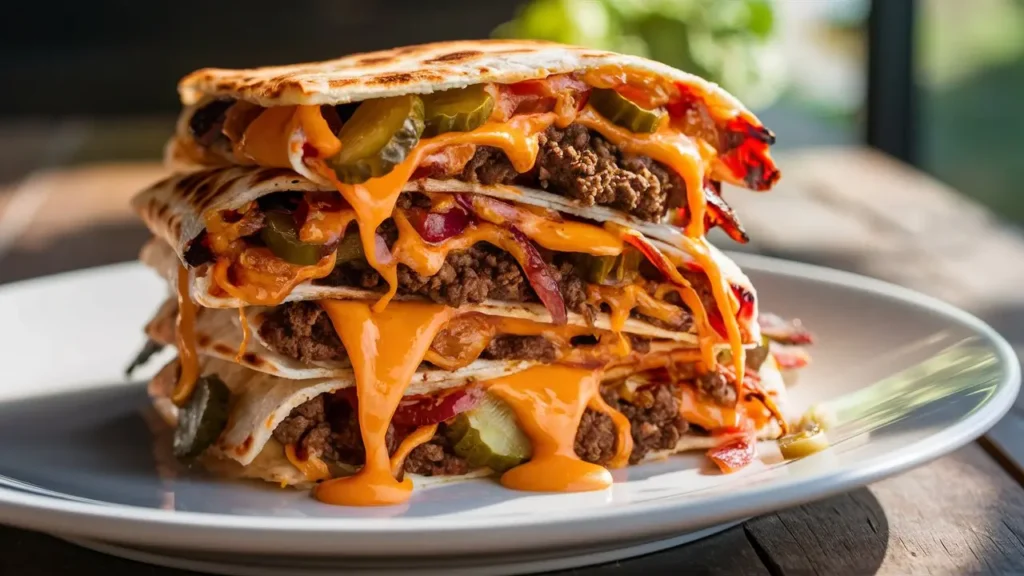
Lay out the tortillas. On one half of each tortilla, sprinkle a layer of cheese, followed by the seasoned ground beef, chopped pickles (if using), and another layer of cheese. Fold the tortilla in half to form a semicircle.
Step 4: Cook Until Golden
Heat a non-stick skillet over medium heat and melt a bit of butter or oil. Place the quesadilla in the pan and cook for 2–3 minutes per side, until golden brown and crispy and the cheese is melted.
Step 5: Slice and Serve
Remove from the skillet and let sit for a minute before slicing into wedges. Serve hot with burger sauce, ketchup, or any dipping sauce you like.
Best Cheese for Cheeseburger Quesadillas
A sharp cheddar works great for a classic cheeseburger flavor. You can also try:
American cheese for that creamy, nostalgic touch.
Pepper Jack if you want a slight kick.
A cheddar-mozzarella blend for great melt and stretch.
Choosing the Right Tortillas
Flour tortillas are ideal because they get crispy and hold everything together without cracking. Go for medium to large sizes to accommodate all the fillings.
Variations to Try
Spicy Cheeseburger Quesadilla
Add chopped jalapeños or a dash of hot sauce to the filling for a spicy twist.
Bacon Cheeseburger Quesadilla
Cook some crispy bacon and layer it inside with the beef and cheese. Smoky, savory, and delicious.
Veggie Cheeseburger Quesadilla
Use plant-based ground meat and load it with sautéed mushrooms, onions, or even avocado.
Serving Suggestions
Serve your cheeseburger quesadillas with:
French fries or sweet potato fries
A fresh garden salad
Coleslaw
Pickle spears
Dipping sauces like ranch, spicy mayo, or garlic aioli
Make-Ahead Tips
Prepare the beef filling in advance and store in the fridge for up to 3 days.
Assemble the quesadillas and refrigerate, uncooked, then cook them fresh just before serving.
Freeze cooked quesadillas and reheat in a skillet or oven for a quick snack or lunch.
How to Store and Reheat
Storage:
Store leftovers in an airtight container in the refrigerator for up to 3 days.
Reheating:
Skillet: Reheat on a pan over medium heat for 2–3 minutes per side.
Oven: Bake at 350°F (175°C) for 8–10 minutes.
Microwave: Use only if you’re in a hurry, but the tortilla may become soggy.
Nutritional Information (Approximate per serving)
Calories: 450–550
Protein: 25g
Fat: 30g
Carbs: 35g
Fiber: 2g
Sugar: 3g
Note: Values can vary based on ingredients and portion sizes.
Tips for Success
Use lean ground beef to avoid a greasy filling.
Drain excess fat after browning the meat for a better texture.
Don’t overstuff the quesadillas; too much filling makes them hard to flip.
Press down gently while cooking to help the cheese melt evenly and the tortilla brown perfectly.
Fun Add-Ons for Serving
Crumbled bacon on top
A drizzle of burger sauce
Sesame seeds sprinkled over for a bun-like touch
Fresh chopped onions and tomatoes for extra crunch
FAQs
Can I make cheeseburger quesadillas ahead of time?
Yes! Prepare the beef mixture up to 3 days in advance, or assemble the quesadillas and refrigerate them uncooked. Cook fresh before serving.
What’s the best cheese to use?
Sharp cheddar gives classic flavor, but American, Pepper Jack, or blends also work great.
Can I use corn tortillas?
It’s not recommended for this recipe—corn tortillas break more easily and don’t hold the heavy filling as well as flour tortillas.
How can I make this recipe low-carb?
Use low-carb tortillas and swap the ketchup for sugar-free versions.
Can I freeze cheeseburger quesadillas?
Yes! Freeze cooked quesadillas individually wrapped. Reheat in a skillet or oven for best texture.
Conclusion
Cheeseburger quesadillas are the perfect comfort food fusion—crispy on the outside, juicy and cheesy on the inside. Whether you’re feeding a hungry family or looking for a crowd-pleasing party snack, this recipe delivers. With endless possibilities for toppings and variations, it’s a delicious and creative way to enjoy two favorite dishes in one. Try it once, and it will quickly become a staple in your kitchen.